Pages

Friday 21 March 2014

When the music stops

 
AdrieJanssenStarkWhenTheMusicStopsCG_ADRIE
 
 
This tutorial was written by a WWI group owner and, if there is any similarity or resemblance to any other tutorial, then that is purely a coincidence.  


MATERIALS
I have permission to use this beautiful tube from Adrie Janssen-Stark whose site you can find HERE
My Selections HERE
 
PLUGINS
&>Bkg -  Kaleidoscope
L & K’s - Palmyre
Simple
AP01 Lines - Silver Lining
MuRa’s Meister – Perspective Tiling
 
Please Note – This tutorial is written specifically for this tube and colours
If you are using an alternative you may have to experiment with the Blend Modes and Opacities
If you are using the same tube set your foreground material to #c0c0c0
Set your background material to #494d58
Save the Selection Files in your Selections Folder in PSP

Open a New Transparent Raster Layer 700 x 550
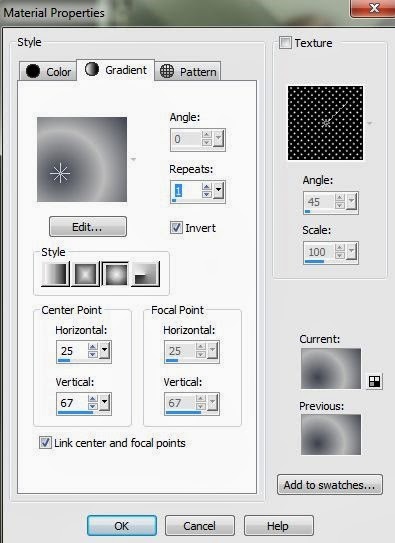
Make a Foreground / Background Sunburst gradient as follows
SS01
Flood Fill your image with the Gradient
Adjust / Blur / Gaussian Blur / 26
Effects / Plugins / &<Bkg Kaleidoscope / @Blueberry Pie / Default
Layer / Duplicate

Image / Mirror and then Image / Flip
Set the Opacity of this layer to 50%
Effects / Edge Effects / Enhance
Layers / Merge / Merge Down

Open a New Raster Layer
Selections / Load/Save Selections / Load Selection From Disk / Find CazMusicStopSel#1
Flood Fill the Selection with your background colour
Effects / Plugins / L & K / Palmyre / 255 / 7
Set the Opacity of this layer to Soft Light

Duplicate the Layer
Selections / Select None
Effects / Plugins / Simple / Left Right Wrap
Set the Blend Mode to Overlay and the Opacity to 80%
Effects / 3D Effects / 0 / 0 / 50 / 25 / Black
Repeat Drop Shadow on Raster 2

Activate Raster 1
Selections / Load/Save Selections / Load Selections From Disk / Find CazMusicStopsSel#2
Promote the Selection to Layer
Selections / Select None

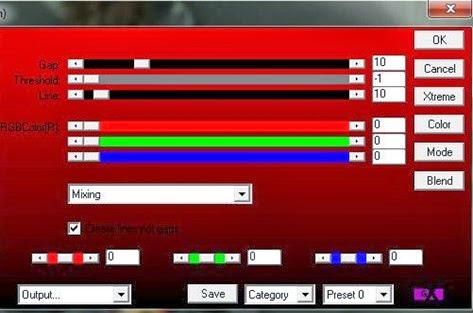
Effects / Plugins / AP Lines / Silver Lining / Settings below
10 / –1 / 10 / 255 / 255 / 255 / Breaks In Fence
SS1
Layer / Duplicate
Image / Flip
Layers / Merge / Merge Down
Add the same Drop Shadow

Activate the top layer
Layers / Merge / Merge Visible
Layers / Duplicate
Effects / Plugins / MuRa’s Meister / Perspective Tiling / Default
Using your Raster Deform / Pick Tool Pull down the Central Top Node until it is just below the dark small squares – see below
SS2
Press Ctrl and grab the Left Hand Top Node and move it to the bottom of the left hand dark square – see below
Ss3
Add the same Drop Shadow to the Floor Layer

Copy your tube and Paste as a New Layer
Resize / Resize All Layers unchecked / Resize by 55% if using same tube
Move into position on the left – see my example
Effects / 3D Effects / Drop Shadow / 4 / 4 / 75 / 35 / Black

Copy the music and the rose layer of the tube
Paste as a New Layer
Image / Resize / Resize All Layers unchecked / Resize by 55%
Place as my example
Add the same Drop Shadow

Switch the Colour Palette so that your light colour is in your Background Materials and set the Foreground to Null
Type your Foreground – I used Gabriola
Effects / 3D Effects / Drop Shadow 2 / 2 / 62 / 5 / Black

Switch your colours again and turn on your Background Materials
Image / Add Border / Symmetrical  / 1 pixel Background Colour
Then 3 pixels Foreground Colour
1 pixel Background Colour
25 pixels Foreground Colour
 
Select the Wide border with your Magic Wand
Promote the Selection to Layer
Effects / Plugins / AP Lines – Silver Lining / See Below
Ss4
Set the Blend Mode of this layer to Difference and Opacity to 85%
Selections / Select None
Image / Add Border / Symmetrical – 1 pixel Background Colour
3 pixels Foreground Colour
1 Pixel Background Colour
 
Image / Resize / Resize All Layers checked / Resize to 600 pixels wide
Add your artist’s copyright information and licence # if applicable
Add your name and Drop Shadow 2 / 2 / 62 / 5 / Black
Add a pretty corner if you wish, duplicate and Image Flip / Image Mirror
Merge Down and Add the same Drop Shadow and your tag is done
Hope you enjoyed this one

Sunday 16 March 2014

The Offering


1010~DawnReberTheOffering

This tutorial was written by a WWI group owner and, if there is any similarity or resemblance to any other tutorial, then that is purely a coincidence.  


MATERIAL
I have permission to use the work of 1010 ~ Dawn Reber HERE
Scrap kit – Mysterious Forest FTU from Scrap & Tubes HERE
WSL_Mask260 HERE
Font used CAC Shishoni Brush
 
 
Open an New Transparent Raster Image 700 x 700
Open a New Raster Layer
Selections / Select All
Open your Mysterious Forest Paper 1 and Copy and Paste into the Selection
Selections / Select None
Layers / New Mask Layer / From Image / Find your WSL_Mask55 and Press OK
Merge / Merge Group
Rename this layer Mask

With your Ellipse Tool set on Circle
Set your Foreground Colour to Null and your Background Colour to #ffffff
Draw a circle slightly smaller than the central circle in your Mask layer
Move this layer down under the Mask layer

Layers / Merge / Merge Down
Image / Resize / Resize All Layers unchecked / Resize 45%
Use your Raster Deform / Pick Tool  and on your Tool Options Bar
Set position X to 410 and Position Y to 49
Duplicate this layer
Activate the lower layer
Adjust / Blur / Gaussian Blur / 25
Activate the next layer up and Layers / Merge / Merge Down
Duplicate this layer and set the Blend Mode to Hard Light

Copy your tube and Paste as a New Layer
Resize – I resized mine by 70%
Move down and to the left – see my example for guidance
Effects / 3D Effects / Drop Shadow 4 / 4 / 75 / 35 / #422200

From your Mysterious Forest Scrap Kit copy the following elements and resize as listed
Add Drop Shadow to each layer
as above
Element 9 – Resize 85% Drag Layer Beneath Tube layer and position as in example
Element 6 – Resize 90% Position on the right hand side
Element 8 – 100% – Position on the right over the bottom of Element 6
Element 11 – Resize 70% Position in bottom Left Hand Corner moving this layer up over your tube
Element 18 – 100% – Position on right but under your Element 6 layer
Duplicate this layer and Resize the Duplicate by 85%, place behind your tube
Element 19 – 100% Position on Right under Raster Layer 8
Element 20 – 100% – Place as in my example
Element 26 – 100% – Place as in my example
Element 33 – Resize 60% – Drop Shadow 2 / 2 / 62 / 5 / Colour #422200 Place at the bottom right
Activate your Raster 1 layer
Selections / Select All
Copy Paper 2 from your Mysterious Forest Scrap Kit and Paste into Selection
Selection / Select None
Layers / New Mask Layer / From Image / Find your WSL_Mask260
Merge / Merge Group
Image / Resize / Resize all Layers checked / Resize to 600 wide
Add your artist’s copyright information and your licence# if applicable
Add a credit for the Scrap Kit e.g. Scrap by Scrap & Tubes
Now Add your name in a pretty font with some drop shadow and any word art you choose and your tag is finished!
You can add a background of white or just save as a png as it is


Friday 14 March 2014

All About Eyes


ChristianeVleugelsMysthiqueCG_CHRISTIANE


This tutorial was written by a WWI group owner and, if there is any similarity or resemblance to any other tutorial, then that is purely a coincidence.  


MATERIALS
A suitable tube – I have permission to use this tube by Christiane Vleugels whose work you can find HERE 
Background and Animation made by myself HERE
Font used Vujahday Script
 
PLUGINS
Eye Candy 5 Impact – Perspective Shadow
VM Natural – Speed
FM Tile Tools – Blend Emboss


Let’s make a start!
Open the Background.jpg and duplicate using Shift+D and close out the original
Copy your tube and resize so that it fits between the top white border and the bottom white border – if you are using the same tube then resize by 57% and line up on the right hand side
Eye Candy 5 Impact / Perspective Shadow / Settings below
SS3
 
Open a New Raster Layer
Selections / Select All
Selections / Modify / Contract / 30
Selections / Invert
Flood Fill with your Foreground Colour

Effects / Plugins / VM Natural / Speed / Default Settings 104 / 85 / 28 / 0
Keep your Selection and Open A New Raster Layer
Layers / Arrange / Move Down
Flood Fill with #ffffff
Activate the top layer and Layers / Merge / Merge Down
 
Open a New Raster Layer
Selections / Invert
Effects / 3D Effects / Cutout / Settings Vertical and Horizontal 0 / Opacity 100 / Blur 75 / Colour #000000 / Fill interior with colour unchecked
Activate the layer below
Selections / Selections Invert
Effects / Texture Effects / Sandstone / Settings below / colour is Foreground colour
SS4
Effects / Plugins / FM Tile Tools / Blend Emboss / Default Setting

Activate the top layer
Selections / Invert
Open a New Raster Layer
Selections / Modify / Select Selection Borders / Outside / 2 / Anti Alias checked
Flood Fill the Selection with #ffffff
Selections / Select All

Open a New Raster Layer
Flood Fill with White
Selections / Modify / Contract / 2 Pixels
Press Delete on your keyboard
Selections / Select None

Add a pretty corner of choice if you wish
Add your artist’s copyright information and your licence # if applicable
Add your name in a pretty font and add Drop Shadow 2 / 2 / 62 / 5 / Black
If you don’t wish to animate your tag you can finish here
 
ANIMATION
Close off your background layer in PSP
In Animation Shop Open the Background.gif which has 20 frames
Return to PSP and Copy Merged and take into Animation Shop and Paste as a New Animation
Hold down Ctrl and press L until you have 20 frames – you can watch the progress in the bottom right hand side of Animation Shop
Click on the Blue Bar of your tag animation and Edit / Select All
Click on the Blue Bar of your Background animation and Edit / Select All

Now carefully slide the Tag onto the Background animation lining it up – remember there should be a little white border showing all around

Edit / Select All and Animation / Frame Properties / Set to 10 – if you like it faster you can leave at 6
Save your tag as a GIF and we are finished – hope you enjoyed this one!


Thursday 13 March 2014

Tender Moment

 
MonsongwolfTenderMomentCG_MOONSONGWOLF


This tutorial was written by a WWI group owner and, if there is any similarity or resemblance to any other tutorial, then that is purely a coincidence.  
 
MATERIAL
 
I have permission to use the beautiful art of Moonsongwolf whose work you can see HERE
WSL_Mask151 HERE
TenderMomentWArtCG HERE
Fonts Used Mrs Saint Delafield for text and A D Mono for name
 
PLUGINS
CPK Designs - Stars
Xero – Caravaggio and Porcelain


Open a New Transparent Raster Image 700 x 700 – we will resize near the end


Set your foreground colour to #d1cfd0 and your background colour to #90878c
 
With your original colours make a Make a Foreground / Background Gradient Starburst
SS1
 
Flood Fill the layer with the gradient
Effects / Plugins  / CPK Designs / 3D Distortion / Default Settings

Effects / Plugins / CPK Designs / Stars 86 / 218
Effects / Image Effects / Seamless Tiling / Default Settings
Effects / Edge Effects / Enhance More

Layers / New Mask Layer / From Image / Find your WSL-Mask151 and Press OK
Merge / Merge Down
Duplicate this layer twice to make 3 layers in total
Set the Blend Mode of the bottom layers to Blend Mode to Normal
Set the Blend Mode of the middle Layer to Burn
Set the Blend Mode of the top Layer to Luminance (Legacy)
Add Drop Shadow to all 3 layers 1 / 1 / 80 / 1 / Black

Copy your tube and Paste as a New Layer
Resize / Resize All Layers unchecked / by 70%
Duplicate this layer and Image / Mirror
 
Activate your top layer and your Raster Deform / Pick tool
On your Tool Options Bar alter Position X to 133 and Position Y to 300

On your lower tube layer alter the positions to Position X 26 and Position Y 29
Duplicate this layer
On the lower duplicated layer Effects / Texture Effects / Rough Leather / Settings below
SS2
Set the Opacity of this layer to 35%
Activate the copy of this layer (one layer up) and Set the Blend Mode to Burn and the Opacity to 70%

Activate your top tube layer
Effects / Plugins / Xero / Caravaggio / Default Settings
On the same layer / Effects / Plugins / Xero / Porcelain / Default Settings
Set the Opacity of this layer to 73%

Image / Resize / Resize All Layers checked / Resize to 600 pixels wide
Activate your top layer
Add your artist’s copyright information and licence #, if applicable

Copy your TenderMomentWArtCG and Paste as a New Layer, moving into position if needed
Add your name in a pretty font – I used A D Mono and set the name on the side
Add Drop Shadow 2 / 2 / 62 / 5 / Black
And that’s all!
Just save as a PNG or put a background of white if you prefer and save as a JPG
Enjoy!


Wednesday 12 March 2014

Anticipation


MichelleMoniqueAnticipationCG_CHRISSY[5]


This tutorial was written by a WWI group owner and, if there is any similarity or resemblance to any other tutorial, then that is purely a coincidence.    
 
MATERIALS
A suitable tube of your choice – I have permission to use the beautiful art of Michelle Monique HERE
SunsetCG.jpg background painted by me , the animated SunsetCG1.psp  background and the word art made by myself HERE 
WSL_Mask248 HERE
Word Art of choice or your own text
 
PLUGINS
None Used
 
Open a New Transparent Raster Image 700 x 400
Selections / Select All
Copy the SunsetCG.jpg background and Paste into the Selection
Selections / Select None
 
Copy your chosen tube and Paste as a New Layer
Resize as necessary – I resized mine by 80%
Effects / Image Effects / Offset 151 / –54 / Custom and Transparent checked
 
Effects / 3D Effects / Drop Shadow 4 / 4 / 75 / 35 / Colour #713411
 
Activate your background layer
Layer / New Mask Layer / From Image / Find your WSL_Mask248 and Press OK
Merge / Merge Group
 
Image / Canvas Size / Set to 800 x 500 press the Centre Diamond
 
Activate your tube layer and apply the WSL_Mask248 to this layer
Merge / Merge Group
Image / Canvas Size / 700 x 450 pressing the Centre Diamond
 
Copy your chosen Word Art and Paste as a New Layer or apply your own text
Add a Drop Shadow 2 / 2 / 62 / 5 Colour same as before
Add your name in a pretty font – I used Charade_JF
I applied Texture / Soft Plastic / 1 / 57 / 28 / Angle 91 / colour #baf68c to mine
and then Added the same Drop Shadow
 
Now add your artist’s copyright and your licence # if applicable
 
Now we are ready to animate our tag – of course if you don’t wish to animate you can save as a PNG here
 
ANIMATION
Open the SunsetCG1.psp in Animation Shop
Edit / Select All
Edit / Propagate Paste
 
In PSP close off your background layer
Copy Merged and take into Animation Shop and Paste as a New Animation
 
Slide over the Merged Animation and place into your background animation moving into position carefully
Edit / Select All
Animation / Frame Properties / Set at 15
Animation / Animation Properties / Set to Opaque / White
Save as a GIF
I hope you enjoyed making this


Tuesday 11 March 2014

Hope

 
NonsenseChanKagamineCG_JULIA
     
This tutorial was written by a WWI group owner and, if there is any similarity or resemblance to any other tutorial, then that is purely a coincidence.


MATERIAL   

A suitable tube – I have permission to use the work of Nonsense-Chan HERE and used Nonsense-ChanKagamineRin sent through Magical Mists and Tubes recently
Please note that only images sent through any of the WWI groups can be used – the artist has set restrictions so there is a limited list of images
WSL_Mask221 HERE
Scrap – Gothic Inspirations Lavender Sunrise FTU Sampler HERE
Font – Duchess
 
PLUGINS
MuRa’s Meister – Copies
 
 
Open a New Transparent Raster Image 700 x 700
Copy your tube and Paste as a New Layer
 
Effects / Plugins / MuRa’s Meister / Copies / Settings Below
 
SS1
 
Adjust / Blur / Gaussian Blur / 30
Effects / Texture Effects / Mosaic – Glass / Default Setting
 
Layers / New Mask Layer / From Image / Find your WSL_Mask221
Merge / Merge Group
Duplicate this layer
Layers / Merge / Merge Down

Copy your tube again and Paste as a New Layer
Resize / Resize all layers unchecked / 60%
Effects / 3D Effects / Drop Shadow 4 / 4 / 75 / 35 / Colour #533256
 
 
From your Gothic Inspirations Lavender Sunrise Sampler -
 
Copy Lawn and Paste as a New Layer and position at the bottom of your tag – drag this layer below your tube layer
Copy SunwCloud and Paste as a New Layer – Resize 60% and place in the Top LH corner
Copy WordArt1 and Paste as a New Layer – Resize by 90% – add Drop Shadow 2 / 2 / 62 / 5 / Colour #2b401e
Copy BrushedLeaves and Paste as a New Layer – Place bottom right Add the Same Drop Shadow
Duplicate this layer then resize the copy 70% and image / Mirror
Arrange these both together on the right hand side to look like a bush
Merge / Merge Down then drag the Merged layer under the Lawn Layer

Copy Flower6 and Paste as a New Layer – Image / Mirror and Image Resize by 90%
Add the same Drop Shadow and then drag this layer beneath the Merged Leaves layer and arrange as my example

Copy Leaves1 and Paste as a New Layer
Image / Free Rotate / Right / Free / 90 and add  Drop Shadow 4 / 4 / 75 / 35 / Colour same
Arrange on the left side of the tag
Drag the layer under the Lawn Layer and then drag the SunwCloud Layer beneath the Leaves1 layer

Move your tube to the left hand side and ensure that the Word Art is showing
Carefully erase some of the string from the Flower6 on the Right Hand Side so it looks like it’s been strung from the plant

Activate your top layer (tube layer)
Copy the Bird2 and Paste as a New Layer – Resize by 20%
Add Drop Shadow 2 / 2 / 62 / 5 / Colour Same
Move the bird onto the Lawn near your tube

Copy Butterflys1 and Paste as a New Layer
Re-size by 35% and add the same Drop Shadow
Move into position on your tag
 
Image / Resize / Resize All Layers checked / 600 wide
Now we can add our artist’s copyright details and your licence # if applicable and they won’t become distorted
Also add a credit for the scrap maker “Scrap by Gothic Inspirations” is sufficient under your artist’s copyright
 
Add your name in a pretty font – I used Duchess
Add the Drop Shadow we just used and save your tag as a PNG
I hope you enjoyed this tutorial


Sunday 9 March 2014

Rare Orchid

 
JennyLaatschPetalfallsCG_JENN[5]


This tutorial was written by a WWI group owner and, if there is any similarity or resemblance to any other tutorial, then that is purely a coincidence.    


MATERIAL
A suitable tube with an orchid – I have permission to use the beautiful art of JennLaa HERE
3 Masks – I love masks ! ! !
WSL_Mask280, WSL_Mask301 and WSL_Mask 208 HERE
My  OrchidAnimationCG.mng and  LennyLaaschOrchidCG.pspimage made from Jenny Laatsch’s image HERE
Font Used – Vujahday Flourish
 
PLUGINS
MuRa’s Meister – Cloud
 
 
Open a New Transparent Raster Image 700 x 700
Set your foreground colour to #9c4b50  and your background colour to #3e0000
Make a Foreground/Background gradient Linear / Angle 45 / Repeats 2 / invert unchecked
Flood Fill your image with the gradient

Layers / New Mask Layer / From Image / Find your WSL_Mask280, Press OK
Merge / Merge Group
Open a New Raster Layer and Flood Fill with your foreground colour
Layers / New Mask Layer / From Image / Find your WSL_Mask301, Press OK
Merge / Merge Group
Resize this layer only by 95%

Change your background colour to White
New Raster Layer
Arrange / Send to Bottom
Effects / Plugins / MuRa’s Meister / Cloud / Default Setting

Layers / New Mask Layer / From Image / Find your WSL_Mask208, Press OK
Merge / Merge Group

Activate your top layer
Copy your tube and Paste as a New Layer
Resize to the size of the masks – I resized mine by 75%
Move over to the left of your image
 
If you have a hard bottom edge to your tube then go around making a wavy line with your Freehand Selection Tool / Lasso set on Freehand and make a shape similar to this
 
LIAROSS1
Selections / Modify / Feather / 19
Press Delete a couple of times
Selections / Select None

Layers / Duplicate
Image / Mirror
Image / Resize this layer only by 75%
Drag this layer below your larger tube layer
Set the Blend Mode to Luminance (Legacy) and Opacity around 63
Move the tube down slightly and to the right – see my example for placement
 
Activate your main tube layer and add the following Drop Shadow
4 / 4 / 75 / 35 / Colour is #3c0000 (similar but not the same as our background colour)
 
Add your chosen quotation or word art and add the following drop shadow
2 / 2 / 62 / 5 / Colour the same as we just used)

Add your name in the same font and add the same Drop Shadow
Image / Resize / Resize All Layers / 600 wide
Now,  we add our artist’s copyright information and licence # , if applicable and it won’t be distorted as we re-sized first

Set your background colour back to the dark one #3e0000
Set your foreground to gradient and then swap the materials around so the gradient is in the background
Type your name and add the same Drop Shadow
Copy the JennyLaaschOrchidCG.pspimage and Paste as a New Layer
Resize this layer only by 75%
Arrange over part of the name and add the same Drop Shadow
Merge / Merge Down
 
We are now ready to animate our tag – if you have used another tube and the animation is not suitable then you can finish here
 
ANIMATION
Copy Merged and take into Animation Shop
CTL+L until you have 13 frames
Open your OrchidAnimationCG.mng
Animation / Resize Animation / 75%
Click on the blue top bar of the animation and Edit / Select All
Repeat this on your tag
Carefully drag the Orchid from Frame 1 of your OrchidAnimationCG.mng and fit over the Orchid in Frame 1 of your tag
Let go when you have it spot on!
 
Edit / Select All
Animation / Frame Properties / Set to 25
Animation / Animation Properties set to Opaque and White
We have finished and now all you have to do is save as a GIF file
Enjoy!


Sway


ShakilovNeelLatinoDancePairNewCG_SHAKILOV
 
This tutorial was written by a WWI group owner and, if there is any similarity or resemblance to any other tutorial, then that is purely a coincidence.      
 
MATERIAL
A suitable tube – I have permission to use the work of ShakilovNeel HERE
SwayWordArtAnimationCG.mng  HERE
Font used : Scrap Cursive
 
PLUGINS
Simple – Diamonds & Pizza Slice Mirror
MuRa’s Meister – Perspective Tiling
Eye Candy 5 Impact– Perspective Shadow
Eye Candy 5 Texture – Texture Noise
 
 
Choose a foreground colour from your tube – I used #f60838
Choose a background colour from your tube – I used #06243b
 
Open a New Transparent Image 700 x 550
Make a foreground / background gradient  Radial / Settings below
 
Sss01
 
Flood Fill your image with the gradient

Effects / Plugins / Simple / Diamonds
Effects / Image Effects / Seamless Tiling / Default
Effects / Plugins / Simple / Pizza Slice Mirror

Activate your Selection Tool Set on Rectangle
Made a Custom Selection as follows
SSS02
 
Effects / Plugins / MuRa’s Meister / Perspective Tiling / Default Setting
Repeat the Perspective Tiling
Promote the Selection to Layer
Selections / Select None

Effects / 3D Effects / Drop Shadow –4 / 4 /75 / 35 / Black
Repeat the Drop Shadow with the same settings
 
Activate your bottom Background layer
Using your Freehand Selection Tool / Lasso set on Point to Point make a selection as shown

SSS1
 
Promote the Selection to Layer
Selections / Select None
Apply the same Drop Shadow twice
 
Activate your top layer
Copy your tube and Paste as a New Layer
Resize as necessary – I resized mine by 75%

Eye Candy 5 / impact / Perspective Shadow / Settings as below
 
Sss2
 
Duplicate your Promoted Selections with the  triangles layer twice to make 3 layers in all
 
On the top Layer – Effects / Plugins / Eye Candy 5 Textures / Settings as below
SSS3
 
Close the eye of this layer
Activate the layer below and Apply the Eye Candy 5 Textures with the same settings but press the Random Seed button

Close the eye of this layer
Activate the bottom layers of triangles and Apply the Eye Candy 5 Textures with the same settings but press the Random Seed button
Leave the eye of this layer open
 
Activate your top layer

Image / Picture Frame / Cyanotype / (Corel-09.051 Picture Frame) / Settings below

SSS5
Effects / 3D Effects / Drop Shadow
-4 / 4 / 75 / 35 / Black
Repeat but change the Vertical and Horizontal to 4 / –4
Now bring your tube layer up to the top and move the tube left and so that it appears they are about to step out of the frame
 
Image / Resize / Resize all layers checked / Resize to 600 pixels wide
Add your artist’s copyright and licence # if applicable
Add your name in a pretty font – I used Scrap Cursive
Place at the bottom right corner

If you do not intend to animate add your chosen text and you can finish here
 
ANIMATION
 
If you are using your own text add it now and add Drop Shadow 2 / 2 / 62 / 5 / Black
If you are using my animated text then carry on here – we will add the animated text later
Copy Merged and take into Animation Shop and Paste as a New Animation
Return to PSP
 
Close the eye of the bottom Triangle layer and open the eye of the middle layer
Copy Merged and take into Animation Shop
Click on Frame 1 and Paste after the Current Frame
Return to PSP
 
Close the eye of the middle triangle layer and open the eye of the top triangle layer
Copy Merged and take into Animation Shop
Click on Frame 2 and Paste after the Current Frame
 
Open the SwayWordArtAnimationCG.mng
Edit / Select All and Edit / Select All on your tag animation
Slide over the word art from Frame 1 to Frame 1 of your tag and place in position
 
Edit / Select All
Animation / Frame Properties / Set to 50
Save !