MATERIALS
A suitable tube – I have permission to use this image by Jessica Bivans HERE
Fonts used : Bickley Script and Retro Elite
PLUGINS USED
VM Distortion – Slicer
Simple – Diamond
FM Tile Tools – Blend Emboss
Eye Candy 5 Impact – Extrude
Flaming Pear – Lacquer
Background Designer – Bkg Designer sf10 I – Bee Morph
Simple – Diamond
FM Tile Tools – Blend Emboss
Eye Candy 5 Impact – Extrude
Flaming Pear – Lacquer
Background Designer – Bkg Designer sf10 I – Bee Morph
Open a New Transparent Raster Image 700 x 550 – we will resize later
Set your foreground colour to #bd6096 and your background colour to #ffffff or use colours from your own tube if not using the same one
Make a foreground gradient Linear / Angle 45 / Repeats 1 / Invert unchecked
Flood Fill your image with the gradient
Set your foreground colour to #bd6096 and your background colour to #ffffff or use colours from your own tube if not using the same one
Make a foreground gradient Linear / Angle 45 / Repeats 1 / Invert unchecked
Flood Fill your image with the gradient
Effects / Plugins / VM Distortion / Slicer / Settings below
Effects / Plugins / Simple / Diamonds
Effects / Plugins / VM Distortion / Slicer / Default Settings
Effects / Plugins / Simple / Diamonds
Effects / Plugins / VM Distortion / Slicer / Default Settings
Effects / Plugins / Simple / Diamonds
Duplicate the layer
Image / Mirror
Effects / Plugins / Simple / Diamonds
Set the Blend Mode to Multiply and the Opacity to 85
FM Tile Tools / Blend Emboss / Default Settings
Repeat the Blend Emboss
Copy your tube and Paste as a New Layer
Image / Resize / Resize all Layers unchecked / Resize by 70% or if you are using an alternative tube so that it becomes a size similar to mine
Move over to the right hand side of your tag
Effects / 3D Effects / Drop Shadow 4 / 4 / 75 / 35 / Colour #50233f or to suit your tube
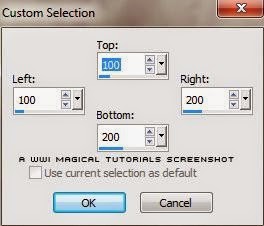
Open a New Raster Layer and make a Custom Selection
Flood Fill with the gradient – Keep the Selection
Open A New Raster Layer
Selections / Modify / Select Selection Border / Inside / 2 pixels
Flood Fill with Black or a suitable colour from your tube
Selections / Select None
Effects / 3D Effects / Drop Shadow / 2 / 2 / 62 / 5 / Black
Layers / Merge / Merge Down
Open A New Raster Layer
Selections / Modify / Select Selection Border / Inside / 2 pixels
Flood Fill with Black or a suitable colour from your tube
Selections / Select None
Effects / 3D Effects / Drop Shadow / 2 / 2 / 62 / 5 / Black
Layers / Merge / Merge Down
Duplicate the Merged Layer 4 times to make 5 layers in all
Mirror the Copy Layer and the Copy 3 Layer
Now activate your Raster Deform / Pick Tool
Activate Copy of Raster 3
Look at your Tool Options Bar and move the X Position to 177 and the Y Position to 177
Look at your Tool Options Bar and move the X Position to 177 and the Y Position to 177
Activate Copy (2) of Raster 3
Move the X Position to 97 and the Y Position to 267
Move the X Position to 97 and the Y Position to 267
Activate copy (3) of Raster 3
Move the X Position to 177 and the Y Position to 347
Finally Activate Copy (4) of Raster 3
Move the X Position to 97 and the Y Position to 437
Close the Tube layer and the 2 background layers
Layers / Merge / Merge Visible
Open up the tube layer and the 2 background layers
Now move up so they are centralised vertically on your tag
Effects / Plugins / Eye Candy 5 Impact / Extrude / Settings Below
Effects / Plugins / Flaming Pear / Lacquer / Settings Below
Add Drop Shadow 2 / 2 / 62 / 5 / Black
Add a New Raster Layer and Selections / Select All
Flood Fill with Black or a dark colour from your tube
Selections / Modify / Contract / 10 pixels
Press Delete on your keyboard
Flood Fill with Black or a dark colour from your tube
Selections / Modify / Contract / 10 pixels
Press Delete on your keyboard
Selections / Select All
Image / Canvas Size / 750 x 600 / Press the centre diamond
Selections / Invert
Open a New Raster Layer and Flood Fill with with gradient
Effects / Plugins / Bkg Designer sf10 I – Bee Morph / Default Settings
FM Tile Tools / Blend Emboss
Repeat the Blend Emboss
Effects / 3D Effects / Inner Bevel / Settings Below
FM Tile Tools / Blend Emboss
Repeat the Blend Emboss
Effects / 3D Effects / Inner Bevel / Settings Below
Selections / Select None
Image / Resize / Resize all Layers checked / Resize to 600 pixels wide
Resize your Merged Layer (the 5 squares) only by 90%
Add your quotation and the same Drop Shadow
Add your quotation and the same Drop Shadow
Add your artist’s copyright information and licence # if applicable on the dark part of the frame
Add your name in a pretty font – I used Retro Elite
And we have finished our tag


No comments:
Post a Comment
Note: only a member of this blog may post a comment.